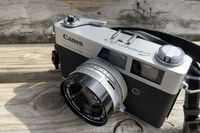
How to use Canon Canonet QL19 film camera.
I've posted several times about the Canon Canonet QL19.
This post is about how to use the Canon Canonet QL19.
I would like to keep it as a memorandum.
Insert the battery
Batteries are not required when shooting in full manual, but batteries are required when using shutter speed priority EE.
I need a H-P (MR-50) or MR9 (H-D) type mercury battery, but mercury batteries have problems such as environmental pollution, so it is almost impossible to get them now.
In terms of cost, I recommend using SR44 or LR44 together with aluminum foil spacers.
See my previous post on batteries. ;)
Insert film
There is a pin on the bottom edge, so pull it to open the back cover.
All that's left is to load the film, but I don't do things like inserting it into the spool.
Just put the tip of the film on the right side and pinch it and close the back cover.
In order to make film loading easy, it has a complicated mechanism, and this is the QL (Quick Loading) system.
After actually loading the film, I thought the "QL" name was true. :)
After that, let's release the shutter and wind the film until the film counter reaches "1".
Set film speed ASA/ISO
Move the film speed setting lever at the bottom of the lens barrel while pressing it.
It is OK to think that the numerical value is ASA = ISO.
This becomes very important when using shutter speed priority EE.
Also, when shooting in full manual mode, I recommend setting it in order to prevent forgetting the film speed.
Shutter speed ring
The shutter speed is 1/500 to 1 second, and bulb photography is also possible.
It is OK if it matches the central mark.
Aperture ring
Aperture is F1.9 to F16.
When set to AUTO, shutter speed priority mode is activated.
It determines the aperture so that the correct exposure is obtained for the set shutter speed.
If it is too bright or too dark, the lock will be applied and the shutter will not be released.
The battery will be consumed while AUTO is selected, so when not using the camera, disable AUTO.
Focus ring
The shooting distance is 0.8m to ∞.
When the double images in the viewfinder match, the focus is achieved.
If the composition and exposure are OK, release the shutter.
After that, repeat the action of winding the film each time the shutter is released.
Self-timer shooting
I will write about self-timer shooting.
The sync contact lever also serves as a self-timer ON/OFF.
So, if you set the sync contact to X, you can move the self-timer lever.
It ends the description above.
I hope this post is useful for you as well. :)


